OpenFeign
概述
- Ribbon+RestTemplate时:利用RestTemplate对Http请求的封装处理。
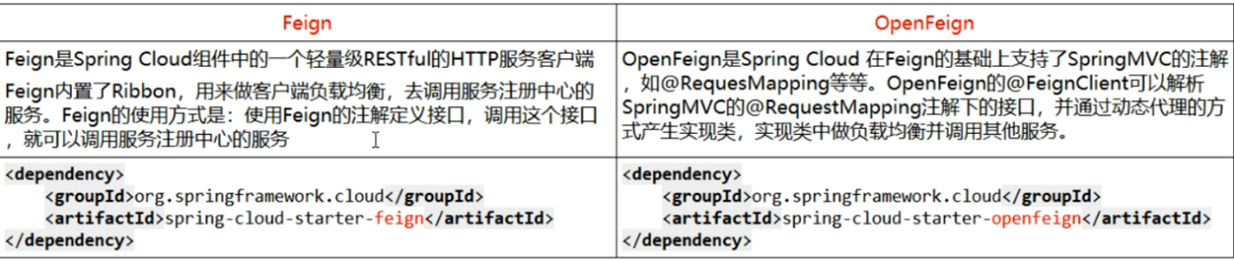
- Feign + Ribbon(SpringCloud低版本)/LoadBalance(SpringCloud高版本版本):只需创建一个接口并使用注解的方式来配置它(微服务接口上面标注一个Feign注解即可),即可完成对服务提供方的接口绑定,底层是基于http请求。
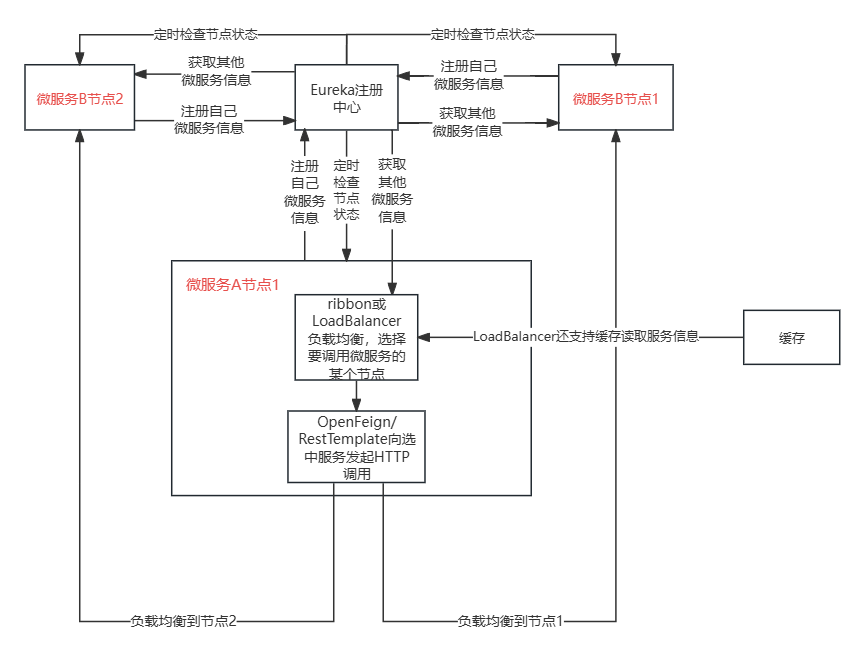
- OpenFeign 是对 Feign 进行了扩展和集成的版本
- openfeign本生并不依赖负载均衡组件,Eureka中自动携带了Ribbon/LoadBalancer实现负载均衡,如果使用nacos需要手动导入LoadBalancer实现负载均衡。
项目搭建
微服务调用接口+@FeignClient
Consumer
pom文件
<!--远程调用-->
<dependency>
    <groupId>org.springframework.cloud</groupId>
    <artifactId>spring-cloud-starter-openfeign</artifactId>
</dependency>

<!--注册中心-->
<dependency>
    <groupId>org.springframework.cloud</groupId>
    <artifactId>spring-cloud-starter-netflix-eureka-client</artifactId>
</dependency>
yml文件
server:
  port: 80
spring:
  application:
  #项目名称
    name: cloud-consumer-feign-order80
eureka:
  client:
    register-with-eureka: true
    fetch-registry: true
    service-url:
      #如果有Eureka集群,就将剩余URL写在后面
      defaultZone: http://localhost:7001/eureka


#负载均衡策略也可以在配置文件中指定
order-service:
  ribbon:
    NFLoadBalancerRuleClassName: com.netflix.loadbalancer.RandomRule
主启动类
@SpringBootApplication
@EnableEurekaClient
@EnableFeignClients
//主启动类上直接添加,指定配置类进行负载均衡,使用LoadBalancer做负载均衡不需要该操作
@RibbonClient(name = "OPEN-FEIGN",configuration = MySelfRule.class)
public class FeignMain {
    public static void main(String[] args) {
        SpringApplication.run(FeignMain.class, args);
    }
}
service层装配
@Service
//注册在Eureka中的服务的名称,字母数字及‘-’组合,不能有下划线,不区分大小写
@FeignClient("OPEN-FEIGN")
public interface OpenFeignService {
    @GetMapping("/openfeign")
    String openFeign();
}

//注意,如果get请求携带了参数,那么必须使用@RequestParam标注
@GetMapping("/openfeign")
String openFeign(@RequestParam("id") Integer id);
Controller层调用
@RestController
public class OpenFeignController {
    @Autowired
    private OpenFeignService openFeignService;

    @GetMapping("/openfeignTest")
    public String openFeign() {
        return openFeignService.openFeign();
    }
}
Provided
同样需要引入Eureka,将自身信息注册到Eureka中
yml
server:
  port: 8080

spring:
  application:
    name: OPEN-FEIGN        # 微服务名称

eureka:
  client:
    register-with-eureka: true #这个配置项决定是否将自己注册到 Eureka 服务注册中心
    fetchRegistry: true #这个配置项决定是否将自己注册到 Eureka 服务注册中心
    service-url:
      defaultZone: http://localhost:7001/eureka,http://localhost:7002/eureka #Eureka服务注册中心的URL
controller
@RestController
public class OpenFeignController {
    @Value("${server.port}")
    private String port;

    @GetMapping("/openfeign")
    public String openFeign() {
        return "openFeign:"+port;
    }
}
Eureka
构建集群或者单节点,详见Eureka
相关配置
信息传递
// 在使用Feign客户端发送请求时,自动将当前请求的token头部信息添加到Feign请求的头部中,使得在多个微服务中信息共享
@Component
public class FeignInterceptor implements RequestInterceptor {

    public void apply(RequestTemplate requestTemplate){
        //  获取请求对象
        RequestAttributes requestAttributes = RequestContextHolder.getRequestAttributes();
        //异步编排 与 MQ消费者端 为 null
        if(null != requestAttributes) {
            ServletRequestAttributes servletRequestAttributes = (ServletRequestAttributes)requestAttributes;
            HttpServletRequest request = servletRequestAttributes.getRequest();
            String token = request.getHeader("token");
            requestTemplate.header("token", token);
        }
    }
}
超时配置
- 连接超时时间(Connect Timeout):默认是10秒。
- 读取超时时间(Read Timeout):默认是60秒。
spring:
  application:
    name: consumer
  cloud:
    nacos:
      discovery:
        server-addr: localhost:8848 #配置Nacos地址
    openfeign:
      client:
        config:
          #配置默认的超时时间
          default:
           #连接超时时间
           connectTimeout: 4000
           #读取超时时间
           readTimeout: 4000
           loggerLevel: full
          #为具体服务单独指定超时时间
          cloud-payment-service:
            #连接超时时间
            connectTimeout: 8000
            #读取超时时间
            readTimeout: 8000
            loggerLevel: full
重试机制
默认不开启重试
OpenFeign配置类
//重试间隔时间是按照指数退避算法进行的。具体来说,每次重试的间隔时间会逐渐增加,直到达到最大间隔时间 maxPeriod。
//第一次重试:等待 period 毫秒。
//第二次重试:等待 period * 2 毫秒。
//第三次重试:等待 period * 4 毫秒。
//以此类推,直到计算出的间隔时间大于或等于maxPeriod,则使用 maxPeriod 作为间隔时间。

/*
	假设我们有一个远程服务,它在大多数时间内都能正常工作,但在某些特定的时间段(例如每天的凌晨3点到4点),由于需要进行数据备份或者系统维护,这个服务可能会暂时无法提供服务。
    如果我们的重试策略只设置了重试间隔时间,例如设置为1秒,那么在这个服务不可用的时间段内,我们的应用会每秒都尝试重新发送请求。这不仅无法解决问题,还可能给这个已经处于高负载状态的远程服务带来更大的压力。
    如果我们同时设置了最大重试间隔时间,例如设置为5分钟,那么在连续的重试中,两次重试之间的等待时间会逐渐增加,直到达到这个最大重试间隔时间。这样,即使在远程服务不可用的时间段内,我们的应用也不会过于频繁地发送请求,从而避免了给远程服务带来额外的压力。
*/

@Configuration
public class RetryerConfig {
    @Bean
    public Retryer retryer(){
        return new Retryer.Default(
                1000, 		//初始间隔时间,单位为毫秒。表示第一次重试和第二次重试之间的等待时间
                1000,       //最大间隔时间,单位为毫秒。表示重试之间的最大等待时间
                3           //最大重试次数
        );
    }
}
自定义配置类
实现 Retryer 接口,重写 continueOrPropagate 方法,一般情况用不上
public class CustomRetryer implements Retryer {

    private final int maxAttempts; //最大尝试次数

    private final long backoff;//重试间隔时间

    int attempt;//当前尝试次数

    public CustomRetryer(){
        this.maxAttempts = 3;
        this.backoff = 1000L;
        this.attempt = 0;
    }

    public CustomRetryer(int maxAttempts, long backoff) {
        this.maxAttempts = maxAttempts;
        this.backoff = backoff;
        this.attempt = 0;
    }


    @Override
    public void continueOrPropagate(RetryableException e) {
        if(attempt++ >= maxAttempts){
            throw e;
        }
        long interval = this.backoff; //重试间隔时间
        try {
            Thread.sleep(interval * attempt); //间隔时间线性增加
        } catch (InterruptedException ex) {
            ex.printStackTrace();
        }
    }

    @Override
    public Retryer clone() {
        return new CustomRetryer();
    }
}
yml文件中指定自定义配置类
openfeign:
  client:
    config:
      default:
      	# 设置自定义重试类
        retryer: com.example.consumer.config.CustomRetryer
Gzip
Gzip主要用来压缩html,css,javascript,等静态文本文件,HTTP Gzip压缩是由WEB服务器和浏览器共同遵守的协议,目前主流的服务器和浏览器都支持。
Gzip压缩需要客户端(浏览器)与服务器端(Tomcat)双方的支持:
1)客户端发送http请求,如果请求头中携带Accept-Encoding: gzip,deflate ,表示告诉服务器需要进行Gzip压缩;
2)服务器在接收请求头上携带有Accept-Encoding: gzip,deflate的请求时,会对响应内容进行压缩,并在响应头中添加Content-Encoding: gzip;表示响应的内容是经过压缩的;如果不符合,那么将不压缩,直接返回。
3)客户端接收到响应后,如果响应头中包含Content-Encoding: gzip那么浏览器会自动将响应内容进行Gzip解压缩,然后再呈现在页面上。如果不包含,那么将直接呈现在页面上。
openfeign配置
spring:
  application:
    name: cloud-consumer-order
    openfeign:
      # 使用 HttpClient 5作为HTTP客户端,替换原先默认的okhhtp
      httpclient:
        hc5:
          enabled: true
      compression:
        request:
          # 配置指定的MIME类型才压缩
          mime-types: text/html,application/json
          # 配置最小的压缩大小(小于此大小的文件不压缩)
          min-request-size: 100
          # 开启请求Gzip压缩
          enabled: true
        response:
          # 开启响应Gzip压缩
          enabled: true
      circuitbreaker:
        enabled: true
        group:
          #没开分组永远不用分组的配置。精确优先、分组次之(开了分组)、默认最后
          enabled: true
日志打印
Feign提供了日志打印功能,我们可以通过配置来调整日志级别,从而了解Feign中Http请求的细节,对Feign接口的调用情况进行监控和输出。
日志级别
- NONE:默认的,不显示任何日志
- BASIC:仅记录请求方法、RUL、响应状态码及执行时间
- HEADERS:除了BASIC中定义的信息之外,还有请求和响应的头信息
- FULL:除了HEADERS中定义的信息之外,还有请求和响应的正文及元数据
配置
配置类
@Configuration
public class FeignConfig {
    @Bean
    public Logger.Level feignLoggerLevel(){
        return Logger.Level.FULL;
    }
}
yml文件
#客户端级别的配置,只影响order-service这个Feign客户端。
feign:
  client:
    config:
      order-service:        # 调用哪个服务需要开启日志
        loggerLevel: FULL   # 日志的级别

#类级别的配置,设置Spring的日志级别,不仅影响Feign的日志,还会影响OrderClient类中的其他日志
logging:                    # logging配置配置
  level:
    com.cloud.item.client.OrderClient: debug      # 开启debug日志
Ribbon、OpenFeign、Hystrix
超时
如果 OpenFeign没有设置对应得超时时间,那么将会采用 Ribbon的默认超时时间,如果配置了将采用OpenFeign的超时时间。
- Ribbon 的默认超时连接时间、读超时时间都是 1 秒
- OpenFeign的默认的超时连接时间是 10 秒,读超时时间是 60 秒
假设openfeign与Ribbon选择了Ribbon时间配置
- 如果请求时间超过 ribbon 的超时配置,会触发Ribbon重试;
- 在配置 fallback 的情况下,如果请求的时间(包括 ribbon 的重试时间),超出了 ribbon 的超时限制,或者 hystrix 的超时限制,那么就会熔断。
- Hystrix的超时时间需要大于ribbon请求最长总时间(包括重试),其从命令开始执行时就开始计时,包括所有的重试操作。
#设置Feign客户端超时时间(openfeign默认支持ribbon)
ribbon:
  ReadTimeout:  3000  #读的超时时间,3秒(从目标服务接收响应的最大等待时间。)
  ConnectTimeout: 3000 	#链接的超时时间,3秒
  MaxAutoRetries: 1	 #同一台实例最大重试次数,不包括首次调用
  MaxAutoRetriesNextServer: 1 #请求失败时切换到下一个服务实例并进行重试的最大次数,不包括首次调用
  OkToRetryOnAllOperations: false # 是否对所有操作都进行重试(为 false 时,Ribbon 只会对幂等操作进行重试,即GET请求,对于POST,PUT,DELETE请求不重试)
  #(MaxAutoRetries+1)*(MaxAutoRetriesNextServer+1)=4次,一个实例重试两次,最多试两个实例


#hystrix的超时时间
hystrix:
  command:
    default:
      execution:
        timeout:
          enabled: true	#是否启用 Hystrix 超时机制
        isolation:
          thread:
            timeoutInMilliseconds: 9000 #Hystrix线程隔离的超时时间,单位为毫秒
重试
ribbon的重试机制和Feign的重试机制有冲突,所以源码中默认关闭Feign的重试机制,默认使用feign的重试机制。