单机部署
下载:https://download.redis.io/releases/
1、从官网下载redis安装包,将其上传至Linux中,并且解压到合适目录下
tar -zvxf redis-7.0.15.tar.gz -C /opt2、安装gcc,对Linux源码进行编译
centos7 yum安装网络不可达:https://blog.csdn.net/qq_43768851/article/details/140112143
yum -y install gcc automake autoconf libtool make
yum install gcc gcc-c++

cd /opt/redis-7.0.15

make

make install
3、配置
vim /opt/redis-7.0.15/redis.conf


# 默认bind 127.0.0.1 -::1是开启的,其仅允许本机连接,将其注释掉,将可以允许外部访问
# You will also need to set a password unless you explicitly disable protected
# mode.
# ~~~~~~~~~~~~~~~~~~~~~~~~~~~~~~~~~~~~~~~~~~~~~~~~~~~~~~~~~~~~~~~~~~~~~~~~
# bind 127.0.0.1 -::1


# 默认protected-mode yes开启,其只允许本机的客户端访问,为了其他客户端可以访问,应该将其注释
# By default protected mode is enabled. You should disable it only if
# you are sure you want clients from other hosts to connect to Redis
# even if no authentication is configured.
# protected-mode yes


# requirepass foobared默认关闭,即不需要密码就可以连接,我们将注释解开,设置密码
# The requirepass is not compatible with aclfile option and the ACL LOAD
# command, these will cause requirepass to be ignored.
#
requirepass fujianz123

# 默认是no,将其修改为yes,即redis启动时会在后台启动,而不是前台
# By default Redis does not run as a daemon. Use 'yes' if you need it.
# Note that Redis will write a pid file in /var/run/redis.pid when daemonized.
# When Redis is supervised by upstart or systemd, this parameter has no impact.
daemonize yes

# 默认是"",将其文件输出位置设置到合适的位置
# Specify the log file name. Also the empty string can be used to force
# Redis to log on the standard output. Note that if you use standard
# output for logging but daemonize, logs will be sent to /dev/null
logfile "./redis.log"
4、启动redis
redis-server /opt/redis-7.0.15/redis.conf:需要指定配置文件,不然先前配置将无效
5、命令行连接redis
redis-cli -h 127.0.0.1 -p 6379 -a fujianz123:-h指定ip,-p指定端口号,本机连接,默认端口号则可以忽略这两个参数,-a指定密码,如果配置了的话。
也可以使用其他软件或客户端连接redis。
6、开放端口
#方案一:直接关闭整个防火墙
# 关闭防火墙
systemctl stop firewalld.service
# 查看防火墙的状态
firewall-cmd --state
# 禁止firewall开机启动
systemctl disable firewalld.service


#方案二:关闭指定端口号
# 6379 端口对外开放
firewall-cmd --permanent --add-port=6379/tcp
# 重启防火墙
firewall-cmd --reload
# 查看端口开放情况
firewall-cmd --query-port=6379/tcp

#如果报错: FirewallD is not running,开启防火墙即可
systemctl start firewalld

#下方命令用于关闭端口
firewall-cmd --remove-port=6379/tcp --permanent
主从复制
无哨兵节点
1、在三台单机上部署成功redis,以一台机器作为master,另外两台机器作为Slave。
2、主机配置,完成配置后重启
vim /opt/redis-7.0.15/redis.conf

# slave 服务连接 master 的密码
# If the master is password protected (using the "requirepass" configuration
# directive below) it is possible to tell the replica to authenticate before
# starting the replication synchronization process, otherwise the master will
# refuse the replica request.
masterauth fujianz123
3、两台从机配置,完成配置后重启。由于我们搭建的集群需要自动容灾切换,主数据库可能会变成从数据库,所以三台机器上都需要同时设置 requirepass 和 masterauth 配置项。
vim /opt/redis-7.0.15/redis.conf
# slave 服务连接 master 的密码
# If the master is password protected (using the "requirepass" configuration
# directive below) it is possible to tell the replica to authenticate before
# starting the replication synchronization process, otherwise the master will
# refuse the replica request.
masterauth fujianz123
# 连接master的ip和端口号
# 1) Redis replication is asynchronous, but you can configure a master to
# stop accepting writes if it appears to be not connected with at least
# a given number of replicas.
# 2) Redis replicas are able to perform a partial resynchronization with the
# master if the replication link is lost for a relatively small amount of
# time. You may want to configure the replication backlog size (see the next
# sections of this file) with a sensible value depending on your needs.
# 3) Replication is automatic and does not need user intervention. After a
# network partition replicas automatically try to reconnect to masters
# and resynchronize with them.
#
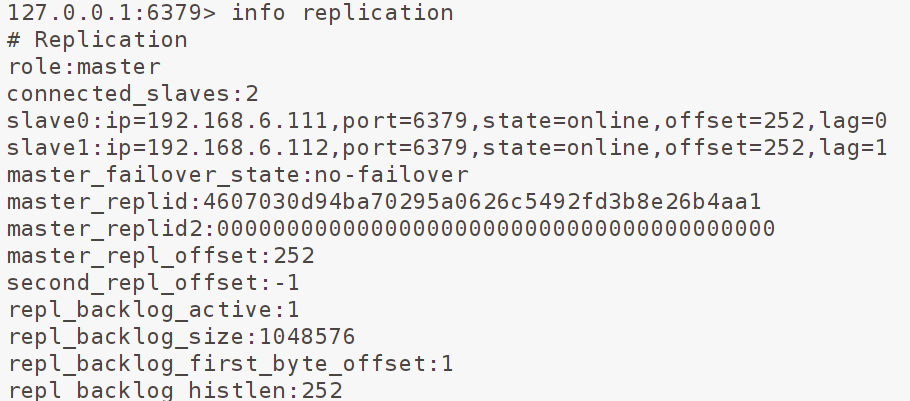
replicaof 192.168.6.110 63794、查看状态
使用info replication主从复制状态,向主数据从写入,将会复制到从数据库。
添加哨兵节点
由一个或多个Sentinel(哨兵)实例组成。它可以监视任意多个主服务器,以及这些主服务器属下的所有从服务器,并在被监视的主服务器进入下线状态时,自动将下线主服务器属下的某个从服务器升级为新的主服务器。
哨兵配置文件
# 哨兵sentinel实例运行的端口,默认26379
port 26379
# 哨兵sentinel的工作目录
dir ./
# 是否开启保护模式,默认开启。
protected-mode:no
# 是否设置为后台启动。
daemonize:yes

# 哨兵sentinel的日志文件
logfile:./sentinel.log

# 哨兵sentinel监控的redis主节点的
## ip:主机ip地址
## port:哨兵端口号
## master-name:可以自己命名的主节点名字(只能由字母A-z、数字0-9 、这三个字符".-_"组成。)
## quorum:当这些quorum个数sentinel哨兵认为master主节点失联 那么这时 客观上认为主节点失联了
# sentinel monitor <master-name> <ip> <redis-port> <quorum>
sentinel monitor mymaster 127.0.0.1 6379 2

# 当在Redis实例中开启了requirepass,所有连接Redis实例的客户端都要提供密码。
# sentinel auth-pass <master-name> <password>
sentinel auth-pass mymaster 123456

# 指定主节点应答哨兵sentinel的最大时间间隔,超过这个时间,哨兵主观上认为主节点下线,默认30秒
# sentinel down-after-milliseconds <master-name> <milliseconds>
sentinel down-after-milliseconds mymaster 30000

# 指定了在发生failover主备切换时,最多可以有多少个slave同时对新的master进行同步。这个数字越小,完成failover所需的时间就越长;反之,但是如果这个数字越大,就意味着越多的slave因为replication而不可用。可以通过将这个值设为1,来保证每次只有一个slave,处于不能处理命令请求的状态。
# sentinel parallel-syncs <master-name> <numslaves>
sentinel parallel-syncs mymaster 1

# 故障转移的超时时间failover-timeout,默认三分钟,可以用在以下这些方面:
## 1. 同一个sentinel对同一个master两次failover之间的间隔时间。
## 2. 当一个slave从一个错误的master那里同步数据时开始,直到slave被纠正为从正确的master那里同步数据时结束。
## 3. 当想要取消一个正在进行的failover时所需要的时间。
## 4.当进行failover时,配置所有slaves指向新的master所需的最大时间。不过,即使过了这个超时,slaves依然会被正确配置为指向master,但是就不按parallel-syncs所配置的规则来同步数据了
# sentinel failover-timeout <master-name> <milliseconds>
sentinel failover-timeout mymaster 180000

# 当sentinel有任何警告级别的事件发生时(比如说redis实例的主观失效和客观失效等等),将会去调用这个脚本。一个脚本的最大执行时间为60s,如果超过这个时间,脚本将会被一个SIGKILL信号终止,之后重新执行。
# 对于脚本的运行结果有以下规则:
## 1. 若脚本执行后返回1,那么该脚本稍后将会被再次执行,重复次数目前默认为10。
## 2. 若脚本执行后返回2,或者比2更高的一个返回值,脚本将不会重复执行。
## 3. 如果脚本在执行过程中由于收到系统中断信号被终止了,则同返回值为1时的行为相同。
# sentinel notification-script <master-name> <script-path>
sentinel notification-script mymaster /var/redis/notify.sh

# 这个脚本应该是通用的,能被多次调用,不是针对性的。
# sentinel client-reconfig-script <master-name> <script-path>
sentinel client-reconfig-script mymaster /var/redis/reconfig.sh
哨兵集群构建
1、在三台机器上部署成功redis,修改redis目录下配置文件sentinel.conf(单机也可以,修改投票数超过1就认为主机挂了)
# 因为配置文件中配置有master,所以哨兵启动后可以连接并会发送一个INFO命令来获取关于Redis服务器的信息(该命令也会将哨兵自身信息注入master,其他哨兵加入时就可以获取,构建哨兵集群之前的关联)

#端口默认为26379。
port:26379
#关闭保护模式,可以外部访问。
protected-mode:no
#设置为后台启动。
daemonize:yes
#日志文件。
logfile:./sentinel.log
#指定主机IP地址和端口,并且指定当有2台哨兵认为主机挂了,则对主机进行容灾切换。
sentinel monitor mymaster 192.168.6.110 6379 2
#当在Redis实例中开启了requirepass,这里就需要提供密码。
sentinel auth-pass mymaster fujianz123

#这里设置了主机多少毫秒无响应,则认为挂了。
sentinel down-after-milliseconds mymaster 3000
#主备切换时,最多有多少个slave同时对新的master进行同步,这里设置为默认的1。
sentinel parallel-syncs mymaster 1
#故障转移的超时时间,这里设置为三分钟。
sentinel failover-timeout master 180000
2、放开sentinel中配置的端口号
#开放端口
firewall-cmd --add-port=26379/tcp --permanent --zone=public
#重启防火墙(修改配置后要重启防火墙)
firewall-cmd --reload
# 查看端口开放情况
firewall-cmd --query-port=26379/tcp

#如果报错: FirewallD is not running,开启防火墙即可
systemctl start firewalld

#下方命令用于关闭端口
firewall-cmd --remove-port=26379/tcp --permanent
3、启动哨兵
# 启动哨兵
redis-sentinel /opt/redis-7.0.15/sentinel.conf

#连接哨兵
redis-cli -p 26379

# 查看监控的节点
SENTINEL slaves master
# 哨兵、主从节点信息
info sentinel
4、当主节点宕机后,哨兵会自动选择从节点上位。
数据分片
1、按照单机部署方式,部署六台机器,其将会被分为3台写机器master,3台读机器slave

2、在每台机器上,删除原先的RDB持久文件与 AOF 持久化文件删除。因为 Redis 分布式系统要求创建在一个空的数据库之上。
cd /opt/redis-7.0.15
# 删除rdb
rm -rf dump.rdb
# 注意,AOF 持久化文件全部在 appendonlydir 目录中,如果存在就将其删除
3、在六台机器上完成文件配置
# 先创建文件夹
mkdir cluster-dir


# 持久化文件、节点配置文件目录,将其配置为上方创建文件夹,便于管理
# The working directory.
#
# The DB will be written inside this directory, with the filename specified
# above using the 'dbfilename' configuration directive.
#
# The Append Only File will also be created inside this directory.
#
# Note that you must specify a directory here, not a file name.
dir "/opt/redis-7.0.15/cluster-dir"


# 开启redis的集群模式
# Normal Redis instances can't be part of a Redis Cluster; only nodes that are
# started as cluster nodes can. In order to start a Redis instance as a
# cluster node enable the cluster support uncommenting the following:
#
cluster-enabled yes


# 可以设置redis集群通信超时时间
# Every cluster node has a cluster configuration file. This file is not
# intended to be edited by hand. It is created and updated by Redis nodes.
# Every Redis Cluster node requires a different cluster configuration file.
# Make sure that instances running in the same system do not have
# overlapping cluster configuration file names.
#
# cluster-config-file nodes-6379.conf

# Cluster node timeout is the amount of milliseconds a node must be unreachable
# for it to be considered in failure state.
# Most other internal time limits are a multiple of the node timeout.
#
cluster-node-timeout 15000
4、启动六台redis
redis-server ./redis.conf5、开放集群通信端口
要获取 Redis Cluster 端口,需要在正常命令端口中添加 10000。例如Redis 节点正在侦听端口 6379 上的客户端连接,则集群通信端口 为16379。
#方案一:直接关闭整个防火墙
# 关闭防火墙
systemctl stop firewalld.service
# 查看防火墙的状态
firewall-cmd --state
# 禁止firewall开机启动
systemctl disable firewalld.service


#方案二:关闭指定端口号
# 6379 端口对外开放
firewall-cmd --permanent --add-port=16379/tcp
# 重启防火墙
firewall-cmd --reload
# 查看端口开放情况
firewall-cmd --query-port=16379/tcp

#如果报错: FirewallD is not running,开启防火墙即可
systemctl start firewalld

#下方命令用于关闭端口
firewall-cmd --remove-port=6379/tcp --permanent
6、将机器加入集群
# 在任一台机器上执行后输入yes即可,--cluster-replicas 1 表示每一台主机会配置有一台从机,后面则是所有机器的ip
redis-cli -a fujianz123 --cluster create --cluster-replicas 1 192.168.6.110:6379 192.168.6.111:6379 192.168.6.112:6379 192.168.6.120:6379 192.168.6.121:6379 192.168.6.122:6379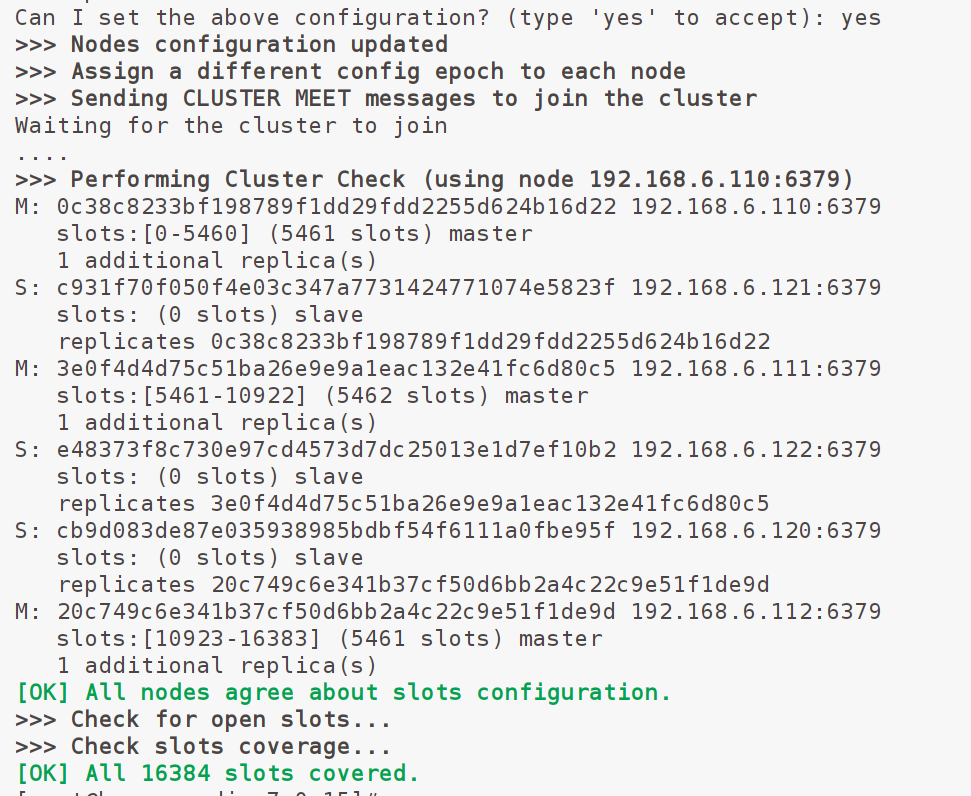
#查看集群信息,-c表示集群链接,-h指定ip(默认本机),-p指定端口号(默认6379) -a 指定密码
redis-cli -c -h 192.168.6.110 -a fujianz123 cluster nodes