SpringBoot
概述
自动配置 : 不需要再关注各个框架的整合配置, springboot全部已经配置好了
SpringBoot配置:https://docs.spring.io/spring-boot/appendix/application-properties/index.html#appendix.application-properties
直接嵌入Tomcat、Jetty or Undertow(无需部署 war 包)
起步依赖 : 集成了大量常用的第三方库的配置,我们在需要使用某个框架的时候, 直接添加这个框架的启动器依赖即可 , 不需要在关注jar包的冲突和整合
SpringBoot依赖:https://docs.spring.io/spring-boot/appendix/application-properties/index.html#appendix.application-properties
SpringBoot项目创建
手动创建
1) 添加父工程坐标
<parent>
    <groupId>org.springframework.boot</groupId>
    <artifactId>spring-boot-starter-parent</artifactId>
    <version>2.2.2.RELEASE</version>
</parent>
2) 导入使用场景
引入Spring Boot提供的自动配置依赖,此处引入web启动器。
<!--添加启动器,其运行所需要的必要包集成在这个启动器中,通过Maven的依赖传递性导入。-->
<dependencies>
    <dependency>
        <groupId>org.springframework.boot</groupId>
        <artifactId>spring-boot-starter-web</artifactId>
    </dependency>
</dependencies>
3) 配置JDK版本
<properties>
    <java.version>1.8</java.version>
</properties>
4)创建启动类
springboot启动必须放在最外侧,且不能直接放到java包下,因为spring-boot启动时会自动加载启动类所在包下及其子包下的所有组件
@SpringBootApplication
public class Application {
    public static void main(String[] args) {
        SpringApplication.run(Application.class,args);
    }
}
5)导入打包插件
<!--    SpringBoot应用打包插件-->
<build>
    <plugins>
        <plugin>
            <groupId>org.springframework.boot</groupId>
            <artifactId>spring-boot-maven-plugin</artifactId>
        </plugin>
    </plugins>
</build>
自动创建
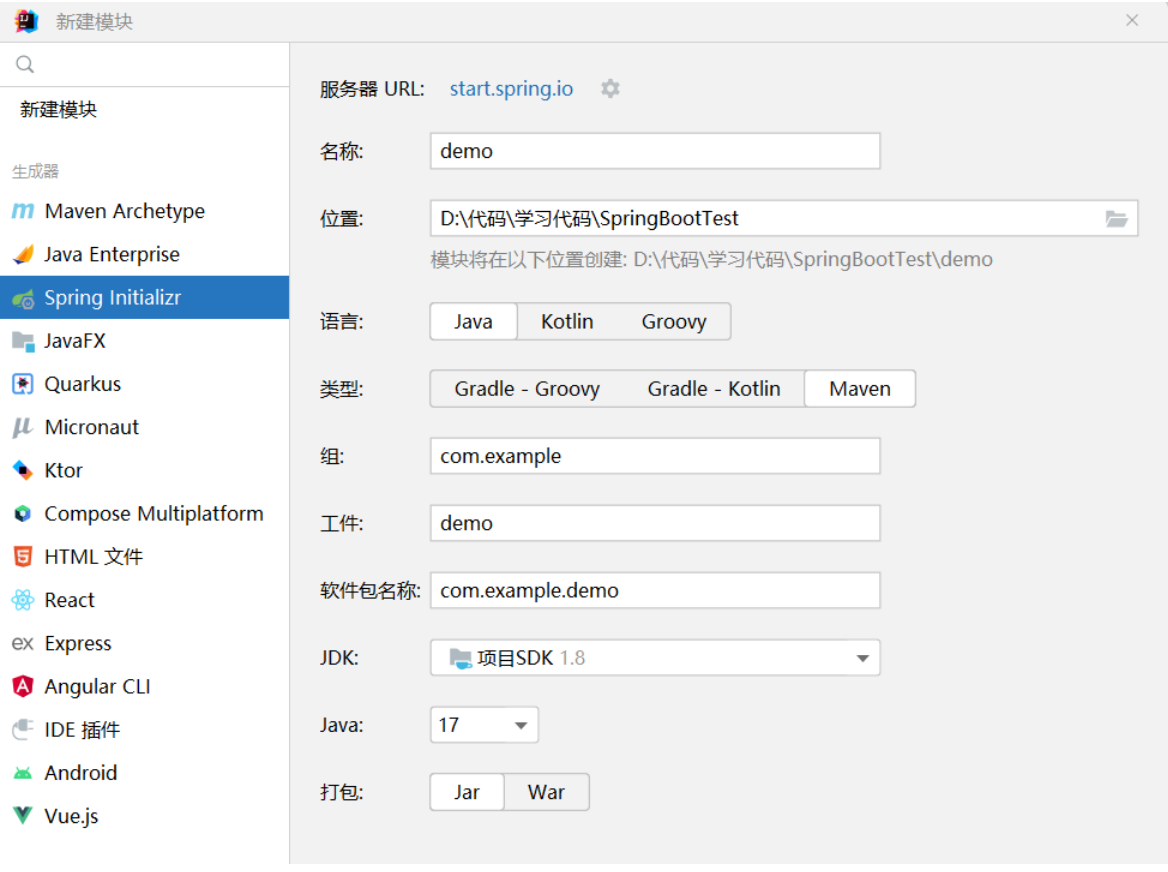
新建模块选择:Spring Initializr,填写对应信息后创建项目
<img src="D:/笔记/网课/笔记/Spring全家桶/图片/image-20231109210010489.png" alt="image-20231109210010489" />
问题:
spring-boot-maven-plugin插件爆红:引入版本号
 <plugin>
     <groupId>org.springframework.boot</groupId>
     <artifactId>spring-boot-maven-plugin</artifactId>
     <version>2.2.2.RELEASE</version>
 </plugin>
ERROR 292 --- [main] o.s.b.d.LoggingFailureAnalysisReporter :
可能是端口号被占用了Your ApplicationContext is unlikely to start due to a @ComponentScan of the default package.
配置文件必须在创建的包下,不能直接放在java下SpringBoot原理
依赖管理机制
1、为什么导入starter-web所有相关依赖都导入进来?
开发什么场景,导入对应场景启动器。根据maven依赖传递原则。A-B-C: A就拥有B和C,导入场景启动器。就自动把这个场景的所有核心依赖全部导入进来
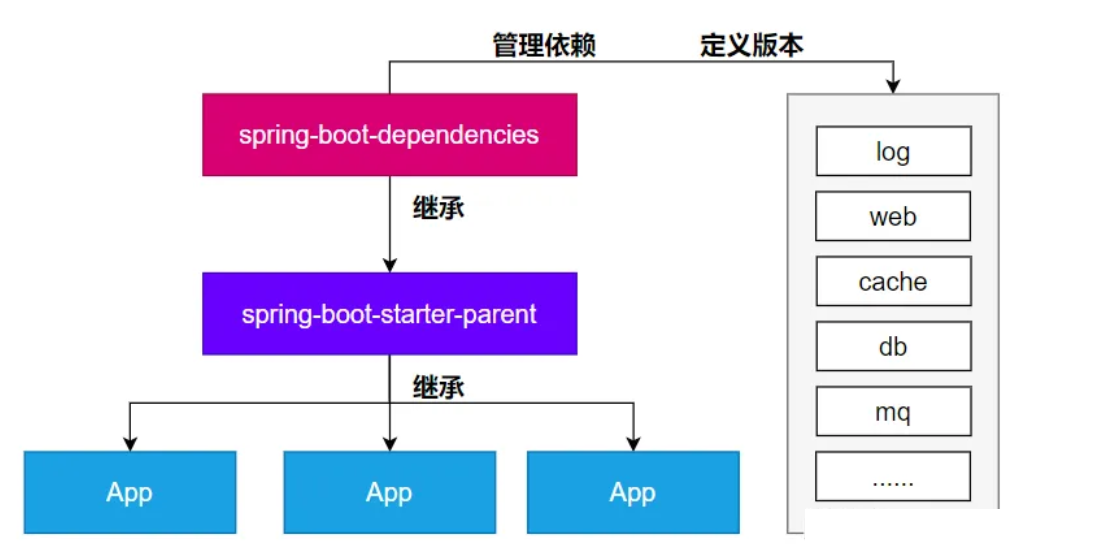
2、为什么版本号都不用写?
每个boot项目都有一个父项目spring-boot-starter-parent,parent的父项目是spring-boot-dependencies,父项目版本仲裁中心,把所有常见的jar的依赖版本都声明好了。
<!--spring-boot-dependencies中依赖版本-->
<properties>
    ……………………………………………………………………………………………………
    <build-helper-maven-plugin.version>3.3.0</build-helper-maven-plugin.version>
    <byte-buddy.version>1.14.10</byte-buddy.version>
    <cache2k.version>2.6.1.Final</cache2k.version>
    <caffeine.version>3.1.8</caffeine.version>
    <cassandra-driver.version>4.15.0</cassandra-driver.version>
    <classmate.version>1.5.1</classmate.version>
    <commons-codec.version>1.15</commons-codec.version>
    <commons-dbcp2.version>2.9.0</commons-dbcp2.version>
    <commons-lang3.version>3.12.0</commons-lang3.version>
    <commons-pool.version>1.6</commons-pool.version>
    <commons-pool2.version>2.11.1</commons-pool2.version>
	……………………………………………………………………………………………………
<properties>
3、自定义版本号
利用maven的就近原则
1、直接在当前项目properties标签中声明父项目用的版本属性的key
2、直接在导入依赖的时候声明版本
4、第三方的jar包
boot父项目没有管理的需要自行声明好
自动配置机制
SPI机制
Java中的SPI(Service Provider Interface)是一种软件设计模式,用于在应用程序中动态地发现和加载组件。SPI的思想是,定义一个接口或抽象类,然后通过在classpath中定义实现该接口的类来实现对组件的动态发现和加载。
在Java中,SPI的实现方式是通过在META-INF/services目录下创建一个以服务接口全限定名为名字的文件,文件中包含实现该服务接口的类的全限定名。当应用程序启动时,Java的SPI机制会自动扫描classpath中的这些文件,并根据文件中指定的类名来加载实现类。
SpringBoot中META-INF/spring/org.springframework.boot.autoconfigure.AutoConfiguration.imports也是这个思想
默认的包扫描规则
@SpringBootApplication 标注的类就是主程序类,只会扫描主程序所在的包及其下面的子包。
自定义扫描路径
- @SpringBootApplication(scanBasePackages = "com.atguigu")
配置默认值
配置文件的所有配置项是和某个类的对象值进行一一绑定的,这种类叫做配置类。
ServerProperties绑定了所有Tomcat服务器有关的配置MultipartProperties绑定了所有文件上传相关的配置
ServerProperties对应的配置类

@ConfigurationProperties(
    prefix = "server",
    ignoreUnknownFields = true
)
public class ServerProperties {
    private Integer port;
    private InetAddress address;
    @NestedConfigurationProperty
    private final ErrorProperties error = new ErrorProperties();
    private ForwardHeadersStrategy forwardHeadersStrategy;
    private String serverHeader;
    private DataSize maxHttpRequestHeaderSize = DataSize.ofKilobytes(8L);
    private Shutdown shutdown;
    @NestedConfigurationProperty
    private Ssl ssl;
    @NestedConfigurationProperty
    private final Compression compression;
    @NestedConfigurationProperty
    private final Http2 http2;
    private final Servlet servlet;
    private final Reactive reactive;
    private final Tomcat tomcat;
    private final Jetty jetty;
    private final Netty netty;
    private final Undertow undertow;
    …………………………………………………………………………
}
按需加载自动配置
场景启动器除了会导入相关功能依赖,导入一个spring-boot-starter,其导入了一个包 spring-boot-autoconfigure。包里面都是各种场景的AutoConfiguration自动配置类。虽然全场景的自动配置都在 spring-boot-autoconfigure这个包,但是不是全都开启的。
完整流程
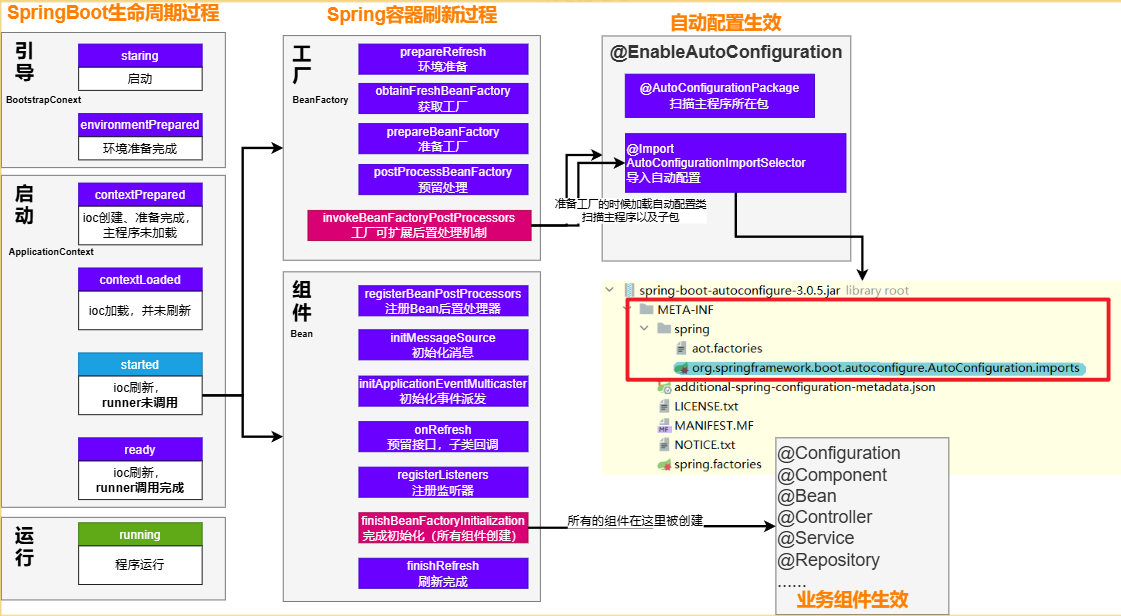
1、导入启动器
场景启动器导入了相关场景的所有依赖,以starter-web为例:
starter-json、starter-tomcat、springmvc每个场景启动器都引入了一个
spring-boot-starter,核心场景启动器。xml<dependency> <groupId>org.springframework.boot</groupId> <artifactId>spring-boot-starter</artifactId> <version>3.1.6</version> <scope>compile</scope> </dependency>核心场景启动器引入了
spring-boot-autoconfigure包。spring-boot-autoconfigure里面囊括了所有场景的所有配置。xml<dependency> <groupId>org.springframework.boot</groupId> <artifactId>spring-boot-autoconfigure</artifactId> <version>3.1.6</version> <scope>compile</scope> </dependency>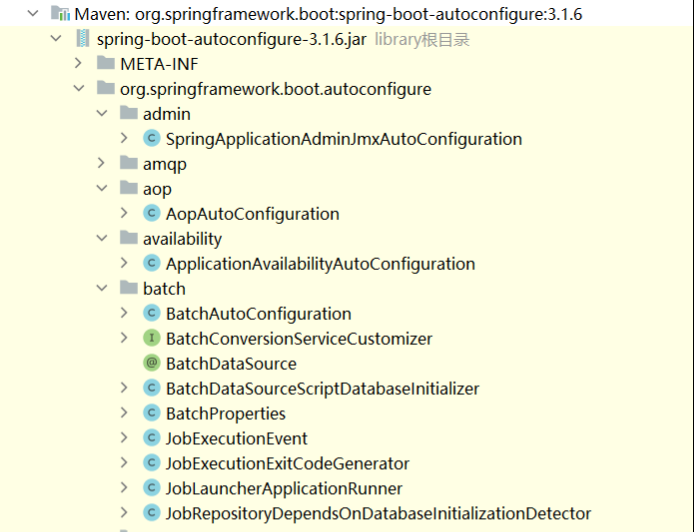
SpringBoot默认只扫描主程序所在的包,扫描不到
spring-boot-autoconfigure包中官方写好的配置类
2、@SpringBootApplication
@SpringBootApplication
@SpringBootApplication由三个注解组成@SpringBootConfiguration、@EnableAutoConfiguratio、@ComponentScan
@Target({ElementType.TYPE})
@Retention(RetentionPolicy.RUNTIME)
@Documented
@Inherited
@SpringBootConfiguration
@EnableAutoConfiguration
@ComponentScan(
    excludeFilters = {@Filter(
    type = FilterType.CUSTOM,
    classes = {TypeExcludeFilter.class}
), @Filter(
    type = FilterType.CUSTOM,
    classes = {AutoConfigurationExcludeFilter.class}
)}
)
public @interface SpringBootApplication {
}
@SpringBootConfiguration
这个注解表示当前类是一个配置类,它会被Spring Boot用来自动配置应用程序。这个注解是@Configuration注解的一个特化版本,它的作用和@Configuration是一样的。
@ComponentScan
这个注解告诉Spring Boot扫描当前包和子包中的所有组件,排除前面已经扫描进来的配置类、和自动配置类。
@ComponentScan(excludeFilters = { @Filter(type = FilterType.CUSTOM, classes = TypeExcludeFilter.class),
      @Filter(type = FilterType.CUSTOM, classes = AutoConfigurationExcludeFilter.class) })
@EnableAutoConfiguration
SpringBoot 开启自动配置的核心。由@Import(AutoConfigurationImportSelector.class)批量给容器中导入组件。SpringBoot启动会默认加载 142个配置类,来自于spring-boot-autoconfigure下 META-INF/spring/org.springframework.boot.autoconfigure.AutoConfiguration.imports文件指定
//扫描主程序包(当前包及其子包),加载自己的组件
@AutoConfigurationPackage
//加载所有自动配置类
//扫描SPI文件:META-INF/spring/org.springframework.boot.autoconfigure.AutoConfiguration.imports
//List<String> configurations =ImportCandidates.load(AutoConfiguration.class,getBeanClassLoader()).getCandidates()
@Import({AutoConfigurationImportSelector.class})
public @interface EnableAutoConfiguration {
    String ENABLED_OVERRIDE_PROPERTY = "spring.boot.enableautoconfiguration";

    Class<?>[] exclude() default {};

    String[] excludeName() default {};
}
//META-INF/spring/org.springframework.boot.autoconfigure.AutoConfiguration.imports下的文件

………………………………………………………………………………………………………………………………
org.springframework.boot.autoconfigure.context.ConfigurationPropertiesAutoConfiguration
org.springframework.boot.autoconfigure.context.LifecycleAutoConfiguration
org.springframework.boot.autoconfigure.context.MessageSourceAutoConfiguration
org.springframework.boot.autoconfigure.context.PropertyPlaceholderAutoConfiguration
org.springframework.boot.autoconfigure.couchbase.CouchbaseAutoConfiguration
org.springframework.boot.autoconfigure.dao.PersistenceExceptionTranslationAutoConfiguration
org.springframework.boot.autoconfigure.data.cassandra.CassandraDataAutoConfiguration
org.springframework.boot.autoconfigure.data.cassandra.CassandraReactiveDataAutoConfiguration
org.springframework.boot.autoconfigure.data.cassandra.CassandraReactiveRepositoriesAutoConfiguration
org.springframework.boot.autoconfigure.data.cassandra.CassandraRepositoriesAutoConfiguration
org.springframework.boot.autoconfigure.data.couchbase.CouchbaseDataAutoConfiguration
org.springframework.boot.autoconfigure.data.couchbase.CouchbaseReactiveDataAutoConfiguration
org.springframework.boot.autoconfigure.data.couchbase.CouchbaseReactiveRepositoriesAutoConfiguration
org.springframework.boot.autoconfigure.data.couchbase.CouchbaseRepositoriesAutoConfiguration
org.springframework.boot.autoconfigure.data.elasticsearch.ElasticsearchDataAutoConfiguration
org.springframework.boot.autoconfigure.data.elasticsearch.ElasticsearchRepositoriesAutoConfiguration
org.springframework.boot.autoconfigure.data.elasticsearch.ReactiveElasticsearchRepositoriesAutoConfiguration
org.springframework.boot.autoconfigure.data.jdbc.JdbcRepositoriesAutoConfiguration
org.springframework.boot.autoconfigure.data.jpa.JpaRepositoriesAutoConfiguration
org.springframework.boot.autoconfigure.data.ldap.LdapRepositoriesAutoConfiguration
org.springframework.boot.autoconfigure.data.mongo.MongoDataAutoConfiguration
org.springframework.boot.autoconfigure.data.mongo.MongoReactiveDataAutoConfiguration
org.springframework.boot.autoconfigure.data.mongo.MongoReactiveRepositoriesAutoConfiguration
………………………………………………………………………………………………………………………………


//并不是这`142`个自动配置类都能生效,每一个自动配置类,都有条件注解`@ConditionalOnxxx`,只有条件成立,才能生效
@AutoConfiguration
//与配置文件中以spring.aop为前缀的属性绑定
@ConditionalOnProperty(
    prefix = "spring.aop",
    name = {"auto"},
    havingValue = "true",
    matchIfMissing = true
)
public class AopAutoConfiguration {
    public AopAutoConfiguration() {
    }

    @Configuration(
        proxyBeanMethods = false
    )
    //条件判断,满足条件才会创建
    @ConditionalOnMissingClass({"org.aspectj.weaver.Advice"})
    @ConditionalOnProperty(
        prefix = "spring.aop",
        name = {"proxy-target-class"},
        havingValue = "true",
        matchIfMissing = true
    )
    static class ClassProxyingConfiguration {
        ClassProxyingConfiguration() {
        }

        @Bean
        static BeanFactoryPostProcessor forceAutoProxyCreatorToUseClassProxying() {
            return (beanFactory) -> {
                if (beanFactory instanceof BeanDefinitionRegistry registry) {
                    AopConfigUtils.registerAutoProxyCreatorIfNecessary(registry);
                    AopConfigUtils.forceAutoProxyCreatorToUseClassProxying(registry);
                }

            };
        }
    }
}
3、自动配置类
- 使用@Bean 给容器中放一堆组件。
- 每个自动配置类都可能有这个注解
@EnableConfigurationProperties(ServerProperties.class),用来把配置文件中配的指定前缀的属性值封装到xxxProperties属性类中 - 给容器中放的所有组件的一些核心参数,都来自于
xxxProperties。xxxProperties都是和配置文件绑定。 - 只需要改配置文件的值,核心组件的底层参数都能修改
4、核心流程总结:
导入
starter依赖导入
autoconfigure寻找类路径下
META-INF/spring/org.springframework.boot.autoconfigure.AutoConfiguration.imports文件启动,加载所有
自动配置类xxxAutoConfiguration- 给容器中配置功能
组件 组件参数绑定到属性类中。xxxProperties属性类和配置文件前缀项绑定@Contional派生的条件注解进行判断是否组件生效
5.效果:
- 给容器中配置功能
- 修改配置文件,修改底层参数
- 所有场景自动配置好直接使用
- 可以注入SpringBoot配置好的组件随时使用
条件注解
这些注解的作用就是进行条件化选择。所谓条件化选择就是如果满足条件, 该配置类就生效, 如果不满足该配置类就不生效
| 注解 | 作用 |
|---|---|
| @ConditionalOnBean | 如果存在某个Bean, 配置类生效 |
| @ConditionalOnMissingBean | -如果不存在某个Bean, 配置类生效 |
| @ConditionalOnClass | 如果存在某个类, 配置类生效 |
| @ConditionalOnMissingClass | 如果不存在某个类, 配置类生效 |
| @ConditionalOnProperty | 如果存在某个属性配置, 配置类生效 |
| @ConditionalOnWebApplication | 如果是一个web应用, 配置类生效 |
| @ConditionalOnNotWebApplication | 如果不是一个web应用, 配置类生效 |
| @ConditionalOnRepositoryType | 如果存储库类型匹配或不存在,则触发指定行为。 |
| @ConditionalOnDefaultWebSecurity | 如果默认的Web安全配置存在,则触发指定行为。 |
| @ConditionalOnSingleCandidate | 如果容器中存在单个候选Bean,则触发指定行为。 |
| @ConditionalOnWarDeployment | 如果当前是一个War部署,则触发指定行为。 |
| @ConditionalOnJndi | 如果JNDI存在于环境中,则触发指定行为。 |
| @ConditionalOnResource | 如果指定的资源存在,则触发指定行为。 |
| @ConditionalOnExpression | 如果给定的Spring Expression Language (SpEL)表达式计算结果为true,则触发指定行为。 |
| @ConditionalOnEnabledResourceChain | 如果资源链被启用,则触发指定行为。 |
| @ConditionalOnCloudPlatform | 如果当前在指定的云平台上运行,则触发指定行为。 |
| @ConditionalOnMissingFilterBean | 如果容器中不存在指定类型的Filter Bean,则触发指定行为。 |
| @Profile | 如果当前环境匹配指定的Profile,则触发指定行为。 |
| @ConditionalOnGraphQlSchema | 如果GraphQL模式存在,则触发指定行为。 |
| @ConditionalOnJava | 如果当前Java的版本匹配指定的范围,则触发指定行为。 |
属性绑定
@EnableConfigurationProperties
启用对@ConfigurationProperties注解的支持
@ConfigurationProperties
声明组件的属性和配置文件哪些前缀开始项进行绑定
@AutoConfiguration
//当存在RedisOperations类才会生效
@ConditionalOnClass({RedisOperations.class})
//导入配置类RedisProperties
@EnableConfigurationProperties({RedisProperties.class})
@Import({LettuceConnectionConfiguration.class, JedisConnectionConfiguration.class})
public class RedisAutoConfiguration {
    public RedisAutoConfiguration() {
    }

    //向容器中放入Bean
    @Bean
    @ConditionalOnMissingBean({RedisConnectionDetails.class})
    PropertiesRedisConnectionDetails redisConnectionDetails(RedisProperties properties) {
        return new PropertiesRedisConnectionDetails(properties);
    }

    @Bean
    @ConditionalOnMissingBean(
        name = {"redisTemplate"}
    )
    @ConditionalOnSingleCandidate(RedisConnectionFactory.class)
    public RedisTemplate<Object, Object> redisTemplate(RedisConnectionFactory redisConnectionFactory) {
        RedisTemplate<Object, Object> template = new RedisTemplate();
        template.setConnectionFactory(redisConnectionFactory);
        return template;
    }

    @Bean
    @ConditionalOnMissingBean
    @ConditionalOnSingleCandidate(RedisConnectionFactory.class)
    public StringRedisTemplate stringRedisTemplate(RedisConnectionFactory redisConnectionFactory) {
        return new StringRedisTemplate(redisConnectionFactory);
    }
}


//将配置类和前缀为spring.data.redis的配置文件进行绑定
ConfigurationProperties(
    prefix = "spring.data.redis"
)
public class RedisProperties {
    private int database = 0;
    private String url;
    private String host = "localhost";
    private String username;
    private String password;
    private int port = 6379;
    private Duration timeout;
    private Duration connectTimeout;
    private String clientName;
    private ClientType clientType;
    private Sentinel sentinel;
    private Cluster cluster;
    private final Ssl ssl = new Ssl();
    private final Jedis jedis = new Jedis();
    private final Lettuce lettuce = new Lettuce();
}
SpringBoot使用概述
以redis为例:
spring-boot-starter-data-redis- 场景AutoConfiguration 就是这个场景的自动配置类
写配置:
- 分析到这个场景的自动配置类开启了哪些属性绑定关系
@EnableConfigurationProperties(RedisProperties.class)- 修改redis相关的配置
分析组件:
- 分析到
RedisAutoConfiguration给容器中放了StringRedisTemplate - 给业务代码中自动装配
StringRedisTemplate
- 分析到
定制化
- 修改配置文件
- 自定义组件,自己给容器中放一个
StringRedisTemplate
SpringBoot配置文件
springboot支持properties和yaml类型的配置文件,配置文件必须放置在项目的类加载目录下, 并且名字必须是application.properties/.yaml/.yml【即resources目录下】
yaml配置文件
- 使用缩进表示层级关系,k : v,键值结构里面的key/value对用冒号 ” : ” 来分隔,大小写敏感
- 缩进时不允许使用Tab键,只允许使用空格。换行
- 缩进的空格数目不重要,只要相同层级的元素左侧对齐即可
- #表示注释,从这个字符一直到行尾,都会被解析器忽略。
- YAML配置文件的扩展名是yaml 或 yml
配置文件值注入
手动注入:
//properties配置文件:
spring.jdbc.datasource.driverClassName=com.mysql.jdbc.driver
spring.jdbc.datasource.url=jdbc:mysql:///springboot_01
spring.jdbc.datasource.username=root
spring.jdbc.datasource.password=root


//yaml配置文件:
spring:
  jdbc:
    datasource:
      driverClassName: com.mysql.jdbc.Driver//键值对在冒号处存在空格
      url: jdbc:mysql:///springboot_01
      username: root
      password: root

//需要注入的Bean对象
@Component
public class DataSourceProperties {
	//指定值为配置文件中的spring.jdbc.datasource.driverClassName
    @Value("${spring.jdbc.datasource.driverClassName}")
    private String driverClassName;
    @Value("${spring.jdbc.datasource.url}")
    private String url;
    @Value("${spring.jdbc.datasource.username}")
    private String username;
    @Value("${spring.jdbc.datasource.password}")
    private String password;

    // 生成get set 和 toString方法
}
自动注入:
@ConfigurationProperties注解:SpringBoot提供的重要注解, 他可以将一些配置属性批量注入到bean对象。
//需要注入属性的Bean对象
//@ConfigurationProperties注解:声明该类要读取属性配置
//prefix="spring.jdbc.datasource" 读取属性文件中前缀为spring.jdbc.datasource的值。前缀和属性名称和配置文件中的key必须要保持一致才可以注入成功
//Spring Boot默认读取application.properties属性文件

@Component
@ConfigurationProperties(prefix = "spring.jdbc.datasource")
public class DataSourceProperties2 {

    private String driverClassName;
    private String url;
    private String username;
    private String password;

     // 省略getter和setter.....
}


//@EnableConfigurationProperties(DataSourceProperties2.class),开启DataSourceProperties2身上@ConfigurationProperties注解 , 他就会生效了, 就会帮助我们注入数据了
@Controller
@EnableConfigurationProperties(DataSourceProperties2.class)
public class HelloController {

    @Autowired
    private DataSourceProperties2 dataSourceProperties2 ;

    @RequestMapping(path = "/hello")
    @ResponseBody
    public String sayHello(){
        System.out.println(dataSourceProperties2);
        return "hello spring boot";
    }
}
多环境配置文件切换
application-{profile}.properties可以作为指定环境的配置文件。
激活这个环境,配置就会生效。profile优先级 > application ,最终生效的所有配置是:
application.properties:主配置文件,任意时候都生效application-{profile}.properties:指定环境配置文件,激活指定环境生效
yaml文件区分环境
application-dev.yml文件
spring:
  jdbc:
    datasource:
      driverClassName: com.mysql.jdbc.Driver
      url: jdbc:mysql:///springboot
      username: root
      password: root
application-pro.yml
spring:
  jdbc:
    datasource:
      driverClassName: com.mysql.jdbc.Driver
      url: jdbc:mysql:///business
      username: business
      password: business
application.yml:激活配置文件
#spring.profiles.active 和spring.profiles.default只能写在主配置文件中
spring:
  profiles:
    active: dev

#设置默认环境为test
spring:
	profiles:
default: test如果properties和yml文件都存在,不存在spring.profiles.active设置,如果有重叠属性,默认以properties优先。
如果设置了spring.profiles.active,并且有重叠属性,以active指定的配置文件优先。
@Profile
任何@Component, @Configuration 或 @ConfigurationProperties 可以使用 @Profile 标记,来指定何时被加载。【容器中的组件都可以被 @Profile标记】
导入配置文件
include
#包含其他profile,例如,如果你有一个名为application-common.properties的文件,你可以通过设置spring.profiles.include[0]=common来包含这个文件中定义的common profile。被包含的profile中的属性将添加到应用程序的环境中,如果与当前激活的profile中的属性冲突,将覆盖当前profile中的同名属性值。
spring.profiles.include[0]=common
spring.profiles.include[1]=local
import
#直接导入其他配置文件。这些配置文件并不需要与任何特定的profile关联。被导入的配置文件中的属性将直接添加到应用程序的环境中,并且如果与主配置文件中的属性冲突,将覆盖主配置文件中的同名属性值。
spring.config.import=my.properties
属性配置文件
配置文件中可以使用 ${name:default}形式取出之前配置过的值。
app.description=${app.name} is a Spring Boot application written by ${username:Unknown}文件配置优先级
SpringBoot 属性源加载顺序。
后面的会覆盖前面的值。由低到高,高优先级配置覆盖低优先级
- 默认属性(通过
SpringApplication.setDefaultProperties指定的) - @PropertySource指定加载的配置(需要写在@Configuration类上才可生效)
- 配置文件(application.properties/yml等)
- RandomValuePropertySource支持的random.配置(如:@Value("${random.int}"))
- OS 环境变量
- Java 系统属性(System.getProperties())
- JNDI 属性(来自java:comp/env)
- ServletContext 初始化参数
- ServletConfig 初始化参数
- SPRING_APPLICATION_JSON属性(内置在环境变量或系统属性中的 JSON)
- 命令行参数
- 测试属性。(@SpringBootTest进行测试时指定的属性)
- 测试类@TestPropertySource注解
- Devtools 设置的全局属性。($HOME/.config/spring-boot)
结论:配置可以写到很多位置,常见的优先级顺序:
命令行>配置文件>springapplication配置
配置文件加载顺序
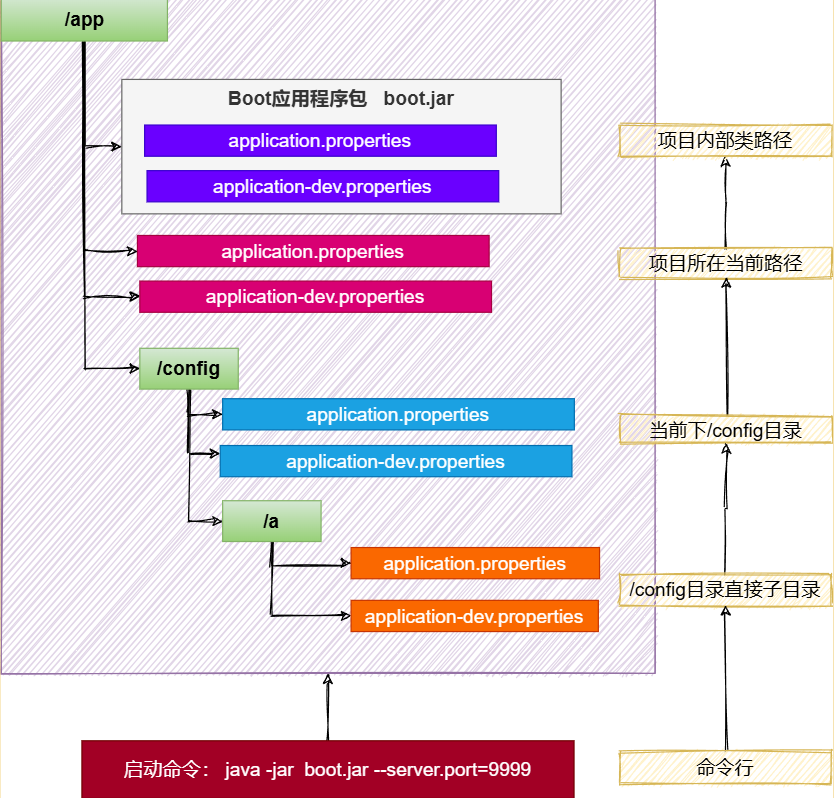
SpringBoot 应用启动时会自动寻找application.properties和application.yaml位置,进行加载。顺序如下:(后面覆盖前面)
类路径: 内部
- 类根路径
- 类下/config包
当前路径(项目所在的位置)
- 当前路径
- 当前下/config子目录
- /config目录的直接子目录
规律
- 命令行 > 所有
- 包外 > 包内
- config目录 > 根目录
- profile > application
- bootstrap.properties > bootstrap.yml > application.properties > application.yml
配置不同就都生效(互补),配置相同高优先级覆盖低优先级
SpringBoot事件和监听器
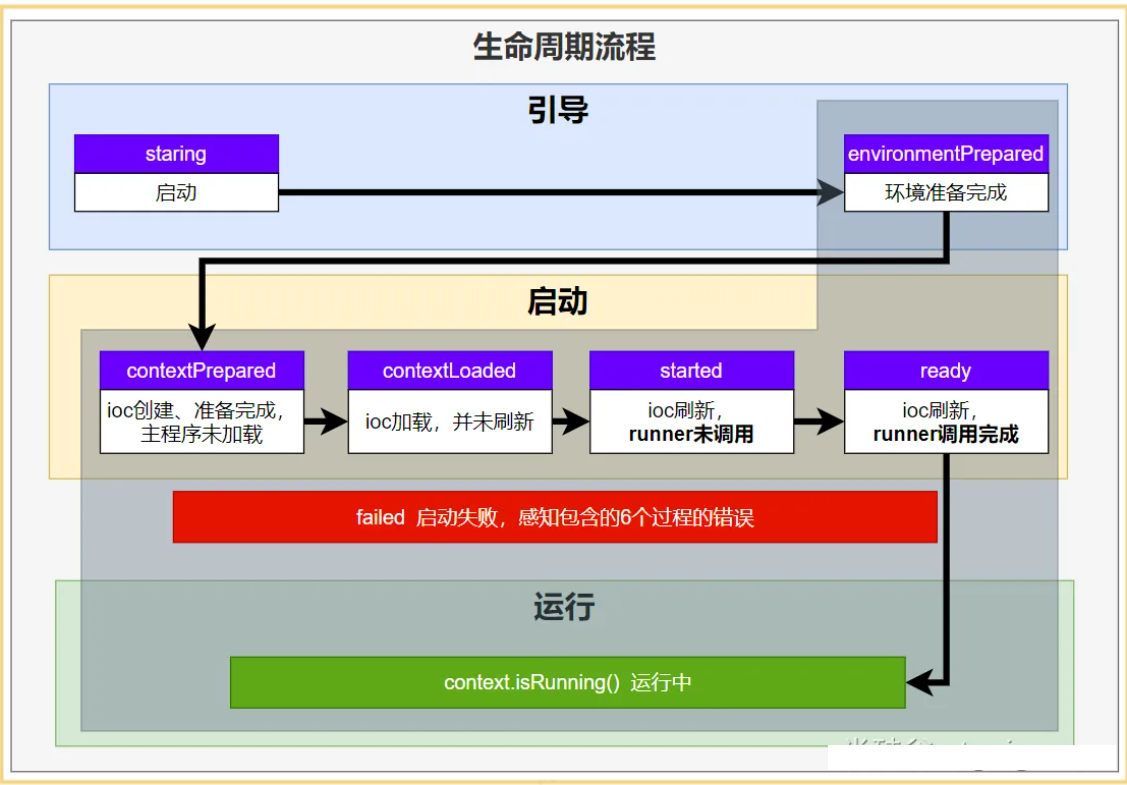
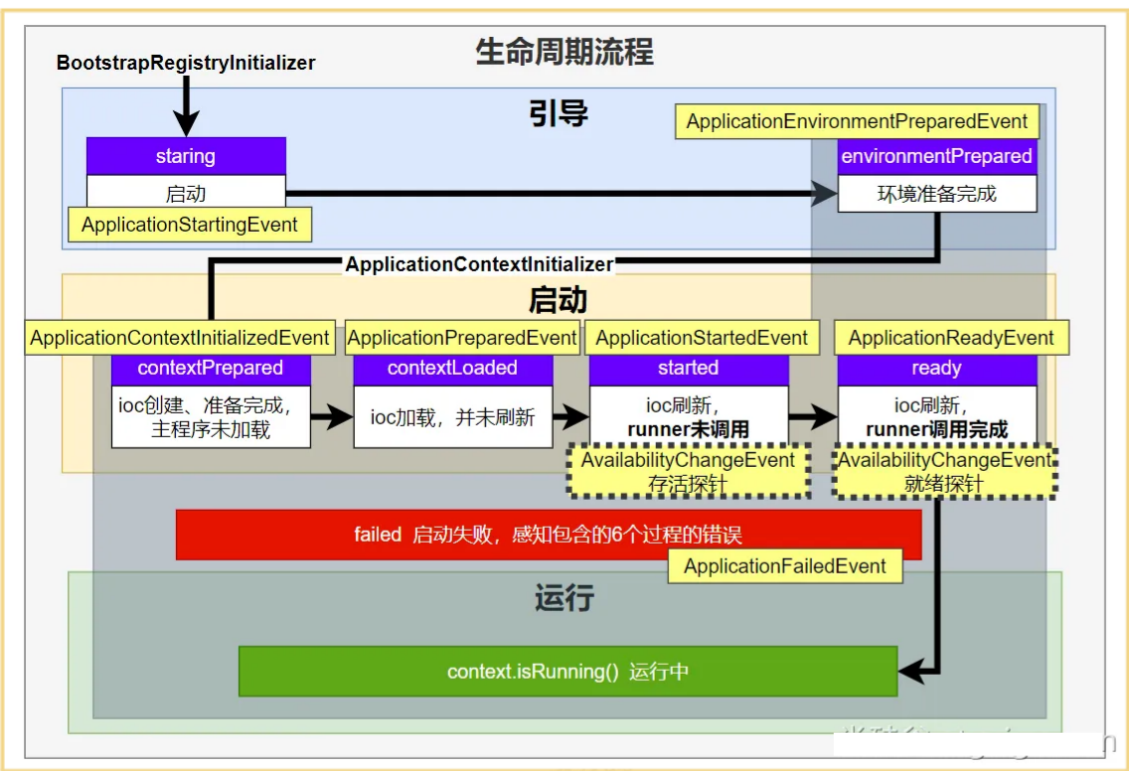
生命周期监听
SpringApplicationRunListener
感知全阶段生命周期 + 各种阶段都能自定义操作
1、实现SpringApplicationRunListener
2、在 META-INF/spring.factories 中配置 org.springframework.boot.SpringApplicationRunListener=自己的SpringApplicationRunListener全类名,在调用run方法的时候,会从META-INF/spring.factories里面读取配置好的listener
public class MyAppListener implements SpringApplicationRunListener {

    //指定有参构造器
    public MyAppListener(SpringApplication application, String[] args) {
	}

    @Override
    public void starting(ConfigurableBootstrapContext bootstrapContext) {
        System.out.println("=====starting=====正在启动======");
    }

    @Override
    public void environmentPrepared(ConfigurableBootstrapContext bootstrapContext, ConfigurableEnvironment environment) {
        System.out.println("=====environmentPrepared=====环境准备完成======");
    }

    @Override
    public void contextPrepared(ConfigurableApplicationContext context) {
        System.out.println("=====contextPrepared=====ioc容器准备完成======");
    }

    @Override
    public void contextLoaded(ConfigurableApplicationContext context) {
        System.out.println("=====contextLoaded=====ioc容器加载完成======");
    }

    @Override
    public void started(ConfigurableApplicationContext context, Duration timeTaken) {
        System.out.println("=====started=====启动完成======");
    }

    @Override
    public void ready(ConfigurableApplicationContext context, Duration timeTaken) {
        System.out.println("=====ready=====准备就绪======");
    }

    @Override
    public void failed(ConfigurableApplicationContext context, Throwable exception) {
        System.out.println("=====failed=====应用启动失败======");
    }
}
BootstrapRegistryInitializer
感知特定阶段:感知引导初始化
1、实现BootstrapRegistryInitializer
2、在 META-INF/spring.factories 中配置 org.springframework.boot.BootstrapRegistryInitializer=自己的BootstrapRegistryInitializer全类名。或者在启动时通过application.addBootstrapRegistryInitializer();添加
场景:进行密钥校对授权。
- java
public class Listener implements BootstrapRegistryInitializer {
    @Override
    public void initialize(BootstrapRegistry registry) {

    }
}
ApplicationContextInitializer
感知特定阶段: 感知ioc容器初始化
1、实现ApplicationContextInitializer
2、在 META-INF/spring.factories 中配置 org.springframework.boot.ApplicationContextInitializer=自己的ApplicationContextInitializer实现类全类名。或者在启动时通过application.addInitializers();添加
public class Listener implements ApplicationContextInitializer {
    @Override
    public void initialize(ConfigurableApplicationContext applicationContext) {

    }
}
**ApplicationListener **
感知全阶段:基于事件机制,感知事件。 一旦到了哪个阶段可以做别的事
1、实现ApplicationListener<ApplicationEvent> ,泛型内指定事件的类型
2、META-INF/spring.factories下配置org.springframework.context.ApplicationListener=自己的ApplicationListener实现类全类名。或者使用SpringApplication.addListeners(…)或 SpringApplicationBuilder.listeners(…)添加,或者使用@Bean或@EventListener: 事件驱动开发
ApplicationRunner
感知特定阶段:感知应用就绪Ready。卡死应用,就不会就绪
//需要放到容器中
@Bean
public ApplicationRunner applicationRunner(){

    return  args -> {
        System.out.println("===ApplicationRunner 运行了.....");
    };
}
CommandLineRunner
感知特定阶段:感知应用就绪Ready。卡死应用,就不会就绪
//需要放到容器中
@Bean
public CommandLineRunner commandLineRunner(){
    return  args -> {
        System.out.println("===CommandLineRunner 运行了.....");
    };
}
总结
- 如果项目启动前做事:
BootstrapRegistryInitializer和ApplicationContextInitializer - 如果想要在项目启动完成后做事:
ApplicationRunner和CommandLineRunner - 如果要干涉生命周期做事:
SpringApplicationRunListener - 如果想要用事件机制:
ApplicationListener
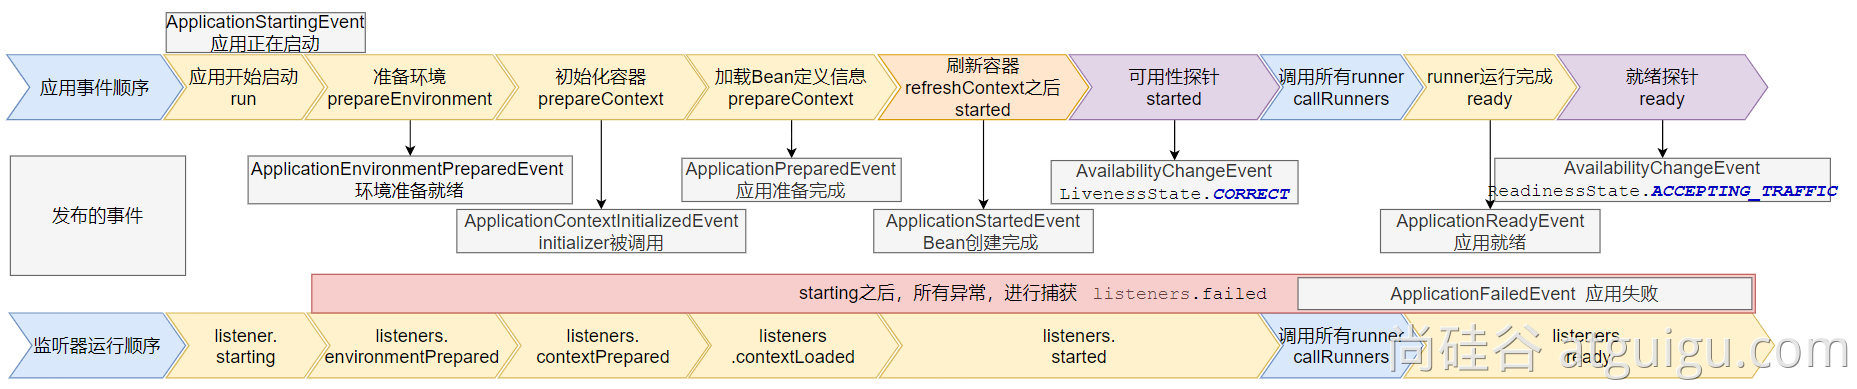
事件驱动开发
事件流程
ApplicationStartingEvent:应用启动但未做任何事情, 除过注册listeners and initializers.ApplicationEnvironmentPreparedEvent: Environment 准备好,但context 未创建.ApplicationContextInitializedEvent: ApplicationContext 准备好,ApplicationContextInitializers 调用,但是任何bean未加载ApplicationPreparedEvent: 容器刷新之前,bean定义信息加载ApplicationStartedEvent: 容器刷新完成, runner未调用
=========以下就开始插入了探针机制============
AvailabilityChangeEvent:LivenessState.CORRECT应用存活; 存活探针。感知应用是否存活了:可能植物状态,虽然活着但是不能处理请求。ApplicationReadyEvent: 任何runner被调用AvailabilityChangeEvent:ReadinessState.ACCEPTING_TRAFFIC就绪探针,可以接请求,感知应用是否就绪了:能响应请求,说明确实活的比较好。ApplicationFailedEvent:启动出错
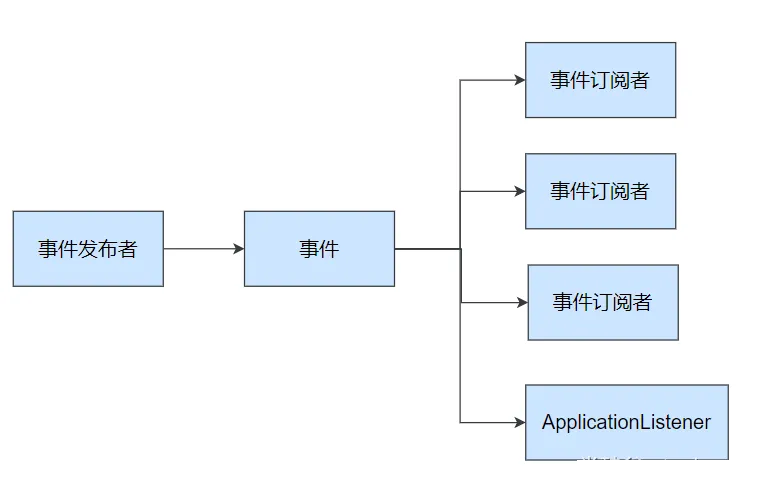
事件驱动开发
- 事件发布:
ApplicationEventPublisherAware或注入:ApplicationEventMulticaster - 事件监听:
组件 + @EventListener
@Service
public class EventPublisher implements ApplicationEventPublisherAware {
/**
* 底层发送事件用的组件,SpringBoot会通过ApplicationEventPublisherAware接口自动注入给我们
* 事件是广播出去的。所有监听这个事件的监听器都可以收到
*/
ApplicationEventPublisher applicationEventPublisher;
/**
* 所有事件都可以发
* @param event
*/
public void sendEvent(ApplicationEvent event) {
//调用底层API发送事件
applicationEventPublisher.publishEvent(event);
}
/**
* 会被自动调用,把真正发事件的底层组组件给我们注入进来
* @param applicationEventPublisher event publisher to be used by this object
*/
@Override
public void setApplicationEventPublisher(ApplicationEventPublisher applicationEventPublisher) {
this.applicationEventPublisher = applicationEventPublisher;
}
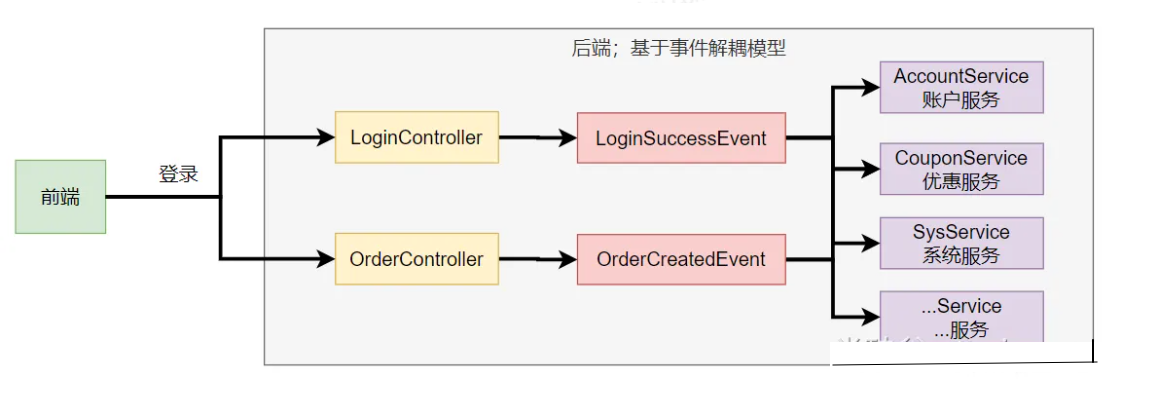
}
//通过@EventListener来监听事件
@Service
public class CouponService {
//Order注解可以规定触发事件的顺序,数字越小,优先级越高
@Order(1)
@EventListener
public void onEvent(LoginSuccessEvent loginSuccessEvent){
System.out.println("===== CouponService ====感知到事件"+loginSuccessEvent);
UserEntity source = (UserEntity) loginSuccessEvent.getSource();
sendCoupon(source.getUsername());
}
public void sendCoupon(String username){
System.out.println(username + " 随机得到了一张优惠券");
}
}
//通过实现ApplicationListener来感知事件
@Order(2)
@Service
public class AccountService implements ApplicationListener<LoginSuccessEvent> {
public void addAccountScore(String username){
System.out.println(username +" 加了1分");
}
@Override
public void onApplicationEvent(LoginSuccessEvent event) {
System.out.println("===== AccountService 收到事件 =====");
UserEntity source = (UserEntity) event.getSource();
addAccountScore(source.getUsername());
}
}SpringBoot自定义Banner
类路径添加banner.txt,此处为默认的banner文件位置
spring.banner.location=classpath:banner.txt,自定义的banner文件位置
生成banner.txt:https://www.bootschool.net/ascii
@SpringBootApplication
public class MyApplication {
    public static void main(String[] args) {
        SpringApplication application = new SpringApplication(MyApplication.class);
        //关闭Banner,默认是开启,可以设置输出为控制台、LOG位置
        application.setBannerMode(Banner.Mode.OFF);
        application.run(args);
    }
}
SpringBoot项目打jar包
pom.xml文件中引入插件,打jar包时如果不配置该插件,打出来的jar包没有清单文件,即依赖导不进去,仅有自己的代码
https://www.bootschool.net/ascii<build>
<plugins>
<!-- 打jar包时如果不配置该插件,打出来的jar包没有清单文件,即依赖导不进去 -->
<plugin>
<groupId>org.springframework.boot</groupId>
<artifactId>spring-boot-maven-plugin</artifactId>
</plugin>
</plugins>
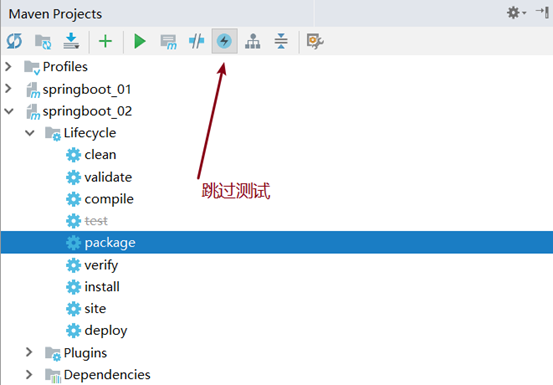
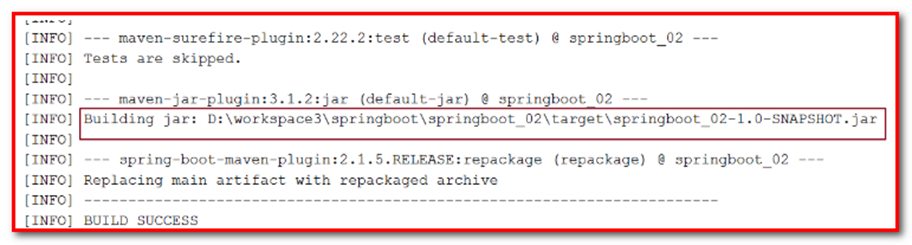
</build>运行maven的打包命令 : package
打包之前我们需要跳过测试 , 如果不跳过测试那么我们编写的测试类都会被maven自动执行, 可能会出现错误,导致打包不成功
去往生成jar包的路径下:
springboot_02-1.0-SNAPSHOT.jar:.jar是可执行jar包,包含了pom中的所有依赖,可以直接用java -jar命令执行- ``springboot_02-1.0-SNAPSHOT.jar.original
:.jar.original` 是普通jar包,不包含依赖
运行jar包
jar包目录下,cmd进入控制面板,java -jar springboot_02-1.0-SNAPSHOT.jar运行jar包。
修改配置文件
jar包同一级目录下添加新配置文件:application.yaml即可,因为其优先级大于jar包内的配置文件。
SpringBoot内嵌容器
容器创建
- SpringBoot 默认嵌入Tomcat作为Servlet容器。
- 自动配置类是
ServletWebServerFactoryAutoConfiguration,EmbeddedWebServerFactoryCustomizerAutoConfiguration
@AutoConfiguration
@AutoConfigureOrder(Ordered.HIGHEST_PRECEDENCE)
@ConditionalOnClass(ServletRequest.class)
@ConditionalOnWebApplication(type = Type.SERVLET)
@EnableConfigurationProperties(ServerProperties.class)
@Import({ ServletWebServerFactoryAutoConfiguration.BeanPostProcessorsRegistrar.class,
		ServletWebServerFactoryConfiguration.EmbeddedTomcat.class,
		ServletWebServerFactoryConfiguration.EmbeddedJetty.class,
		ServletWebServerFactoryConfiguration.EmbeddedUndertow.class })
public class ServletWebServerFactoryAutoConfiguration {

}ServletWebServerFactoryAutoConfiguration自动配置了嵌入式容器场景- 绑定了
ServerProperties配置类,所有和服务器有关的配置server ServletWebServerFactoryAutoConfiguration导入了 嵌入式的三大服务器Tomcat、Jetty、Undertow- 导入
Tomcat、Jetty、Undertow都有条件注解。系统中有这个类才行(也就是导了包) - 默认
Tomcat配置生效。给容器中放 TomcatServletWebServerFactory - 都给容器中
ServletWebServerFactory放了一个 web服务器工厂(造web服务器的) - web服务器工厂 都有一个功能,
getWebServer获取web服务器 - TomcatServletWebServerFactory 创建了 tomcat。
- 导入
- ServletWebServerFactory 什么时候会创建 webServer出来。
ServletWebServerApplicationContextioc容器,启动的时候会调用创建web服务器- Spring容器刷新(启动)的时候,会预留一个时机,刷新子容器。
onRefresh() - refresh() 容器刷新 十二大步的刷新子容器会调用
onRefresh();
容器切换
<properties>
    <servlet-api.version>3.1.0</servlet-api.version>
</properties>
<dependency>
    <groupId>org.springframework.boot</groupId>
    <artifactId>spring-boot-starter-web</artifactId>
    <exclusions>
        <!-- 排除Tomcat的依赖 -->
        <exclusion>
            <groupId>org.springframework.boot</groupId>
            <artifactId>spring-boot-starter-tomcat</artifactId>
        </exclusion>
    </exclusions>
</dependency>
<!-- 引入jetty的依赖 -->
<dependency>
    <groupId>org.springframework.boot</groupId>
    <artifactId>spring-boot-starter-jetty</artifactId>
</dependency>
自定义starter
- 创建
自定义starter项目,引入spring-boot-starter基础依赖 - 编写模块功能,引入模块所有需要的依赖。
- 编写
xxxAutoConfiguration自动配置类,帮其他项目导入这个模块需要的所有组件 - 编写配置文件
META-INF/spring/org.springframework.boot.autoconfigure.AutoConfiguration.imports指定启动需要加载的自动配置 - 其他项目引入即可使用
导入xml
<!--        导入配置处理器,配置文件自定义的properties配置都会有提示-->
<dependency>
    <groupId>org.springframework.boot</groupId>
    <artifactId>spring-boot-configuration-processor</artifactId>
    <optional>true</optional>
</dependency>
编写配置类
@ConfigurationProperties(prefix = "robot")  //此属性类和配置文件指定前缀绑定
@Component
@Data
public class RobotProperties {
    private String name;
    private String age;
    private String email;
}
给容器中导入Robot功能要用的所有组件
@Import({RobotProperties.class, RobotService.class})
@Configuration
public class RobotAutoConfiguration {
    @Bean //把组件导入到容器中
    public RobotController robotController(){
        return new RobotController();
    }
}
导入RobotAutoConfiguration
别人引用这个starter,直接通过import导入这个 RobotAutoConfiguration,就能把这个场景的组件导入进来
通过注解代替
引入starter需要使用 @EnableRobot开启功能
@Retention(RetentionPolicy.RUNTIME)
@Target({ElementType.TYPE})
@Documented
@Import(RobotAutoConfiguration.class)
public @interface EnableRobot {

}
完全自动配置
META-INF/spring/org.springframework.boot.autoconfigure.AutoConfiguration.imports 文件中编写好我们自动配置类的全类名即可。项目启动,自动加载我们的自动配置类
com.atguigu.boot3.starter.robot.RobotAutoConfiguration国际化
Spring Boot 在类路径根下查找messages资源绑定文件。文件名为:messages.properties
多语言可以定义多个消息文件,命名为
messages_区域代码.properties。如:messages.properties:默认messages_zh_CN.properties:中文环境messages_en_US.properties:英语环境
在程序中可以自动注入
MessageSource组件,获取国际化的配置项值在页面中可以使用表达式
#{}获取国际化的配置项值
@Autowired  //国际化取消息用的组件
MessageSource messageSource;

@GetMapping("/haha")
public String haha(HttpServletRequest request){
    Locale locale = request.getLocale();
    //利用代码的方式获取国际化配置文件中指定的配置项的值
    String login = messageSource.getMessage("login", null, locale);
    return login;
}
错误处理
错误处理的自动配置都在ErrorMvcAutoConfiguration中,两大核心机制:
- SpringMVC的错误处理机制依然保留,MVC处理不了,才会交给boot进行处理
- SpringBoot 会自适应处理错误,响应页面或JSON数据

错误页解析
解析一个错误页
- 如果发生了500、404、503、403 这些错误
- 如果有模板引擎,默认在
classpath:/templates/error/**精确码.html - 如果没有模板引擎,在静态资源文件夹下找
精确码.html
- 如果有模板引擎,默认在
- 如果匹配不到
精确码.html这些精确的错误页,就去找5xx.html,4xx.html模糊匹配- 如果有模板引擎,默认在
classpath:/templates/error/5xx.html - 如果没有模板引擎,在静态资源文件夹下找
5xx.html
- 如果有模板引擎,默认在
解析不到错误页
- 如果模板引擎路径
templates下有error.html页面,就直接渲染
总结
前后分离
- 后台发生的所有错误,
@ControllerAdvice + @ExceptionHandler进行统一异常处理。
- 后台发生的所有错误,
服务端页面渲染
- 不可预知的一些,HTTP码表示的服务器或客户端错误
- 给
classpath:/templates/error/下面,放常用精确的错误码页面。500.html,404.html - 给
classpath:/templates/error/下面,放通用模糊匹配的错误码页面。5xx.html,4xx.html
- 给
- 发生业务错误
- 核心业务,每一种错误,都应该代码控制,跳转到自己定制的错误页。
- 通用业务,
classpath:/templates/error.html页面,显示错误信息。